When you are first starting out writing a novel and are not set in your ways, you tend to look closely at how other writers ply their craft. This includes how they structure their novels and what software programs they use. Every writer is different and we all have our own way of doing things. The only way you are going to discover what works for you is to try the methods that others use and see if you like them. This post is not designed to be a tutorial on how to use Plume Creator, it is intended to show you how I use Plume Creator. Your mileage my vary and your methods may be completely different.
For this post I’m showing screen shots of my actual Works In Progress (WIP), the Space Opera novel, The Blood Empress and a future SF novel, Betweos. There may be spoilers in the images. If you are a reader and don’t want to have the stories ruined for you, perhaps you should skip this post. I’ll do my best to not show critical moments, but if you study these images, you could glean quite a bit about the stories. You have been warned. This is a bit like Dorthy looking behind the curtain and seeing how the Wizard works his magic. There will be inside baseball talk for writers ahead. Oh, and all images are clickable for larger versions.
Plume Creator
Last year I switched from using Mac OS to Linux. The move was not difficult but it did leave me without a decent writing program. I had been using Scrivener, but they don’t officially support Linux so I started looking for something like Scrivener for Linux. That’s when I discovered Plume Creator. Plume is an Open Source program written by an excellent programmer who also happens to be a writer. I started using it and realized that it was a diamond in the rough. I offered to help test the program and over time, several other writers did the same. In the past year Plume has progressed to be a world class piece of software that might soon be challenging Scrivener for the hearts and minds of writers. Especially those of us on Linux.
You can download Plume Creator from their website here: http://www.plume-creator.eu/site/index.php/en/
There is a Mac port of Plume Creator and it’s maintained by a user. You can find it here, under Recent Releases: http://sourceforge.net/projects/plume-creator/
There are some excellent video tutorials available here: https://www.youtube.com/channel/UCBc6wtPgUK1iziNx5UV0lSQ
Getting Started
Plume has a default theme on the left and a dark theme known as Space Opera on the right. I mostly use the dark theme because it matches my OS, Ubuntu. For these posts I’ll be sticking to the dark theme, I just wanted to let you know that there is an alternative. You can also create your own custom theme using the Settings Dialogue shown in the picture on the right above.
To start a new project go to the top menu of Plume called Project and select New Project (ctrl+n). This brings up the New Project Assistant. This is the most efficient way to create a new novel in Plume.
Specify the new project name and the location you wish to save it.
I put all my projects on DropBox a web based, version controlled file system. If you just put your project on your local drive, you won’t have version control which is a way to recover previous saves of your project. Also, if your hard drive crashes, you will be out of luck entirely. Saving to DropBox creates a local drive version and auto-magically backs it up to the cloud. This has saved my butt many times. Do it.
The final screen of this assistant lets you select how many Books, Acts, Chapters and Scenes you want to include in your Project. Normally, if you are just doing one book, then you won’t need multiple books in one project, but if you were doing a trilogy, you’d want to have three similar books in one project.
Nobody knows how long their book will be in the end so this is really just an educated guess. You’ll be able to add or subtract chapters and scenes later as you outline or just plow through your novel pantser style. I usually format my novels into four Acts each act contains about four chapters and each chapter contains about four scenes. Again, this is just a guideline. Something to get you started with. You can add and subtract anything at a later date.
Here’s a closeup of the assistant. You can see it adding things on the right as you change the numbers under Count.
There are many other options available such as Short Story, Short Novel and Long Novel. After you are satisfied with the overall structure of your novel click finished and your project is ready to go.
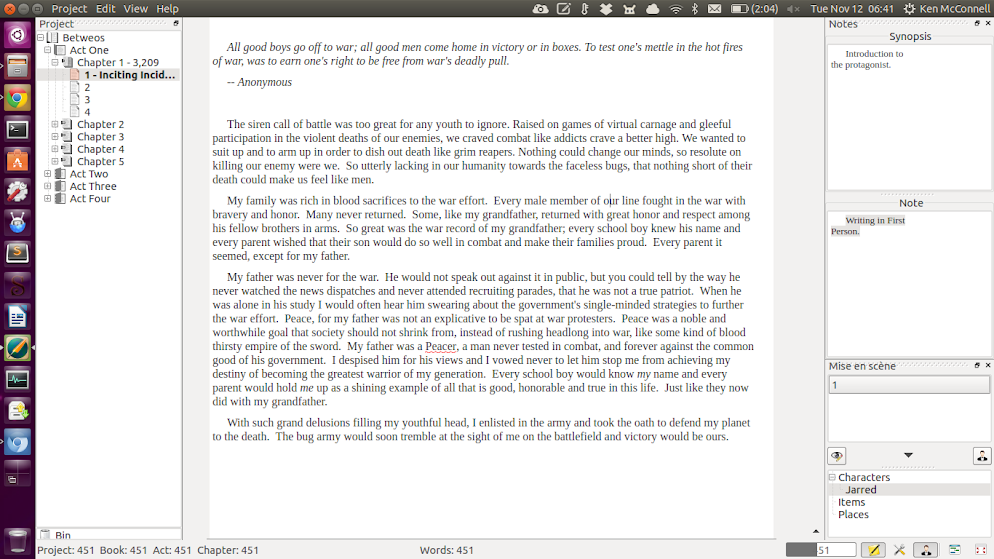
You still have to label the chapters and the scenes in your novel outline. I label chapters (Chapter 1) and I just use numbers for my scenes. I figure there is no need to write “scene” because the icon for scene is a page of paper. All the parts of a novel have their own icon in the Project tree. I label my acts, (Act 1-4). Again, you can do it however you want. As you can see from the above screenshot, you can collapse the Acts and the Chapters to better view the areas of your novel that you are interested in.
Setting badges. You can set badges on every element of the project tree. I use badges to set things like Turning Points on scene headers and word counts on chapter headers. Below you can see the right click menu where the badges are set.
Below you can see Chapter 1 has a word count set as a Badge and the first scene has Inciting Incident as a badge.
Outline
I outline my novels using the Project tree on the left and the Synopsis area to the right of the main editor. I drop a two or three sentence description of what happens in each scene and add a Badge to the scene to describe it if something significant happens like it’s a Turning Point. Below you can see a novel, The Blood Empress, that’s been outlined in the tree and the Synopsis has been filled in. This makes writing the novel much faster for me as I already have a prompt for each scene. However, this is not set in stone. You can change it and I frequently do to control pacing or flow.
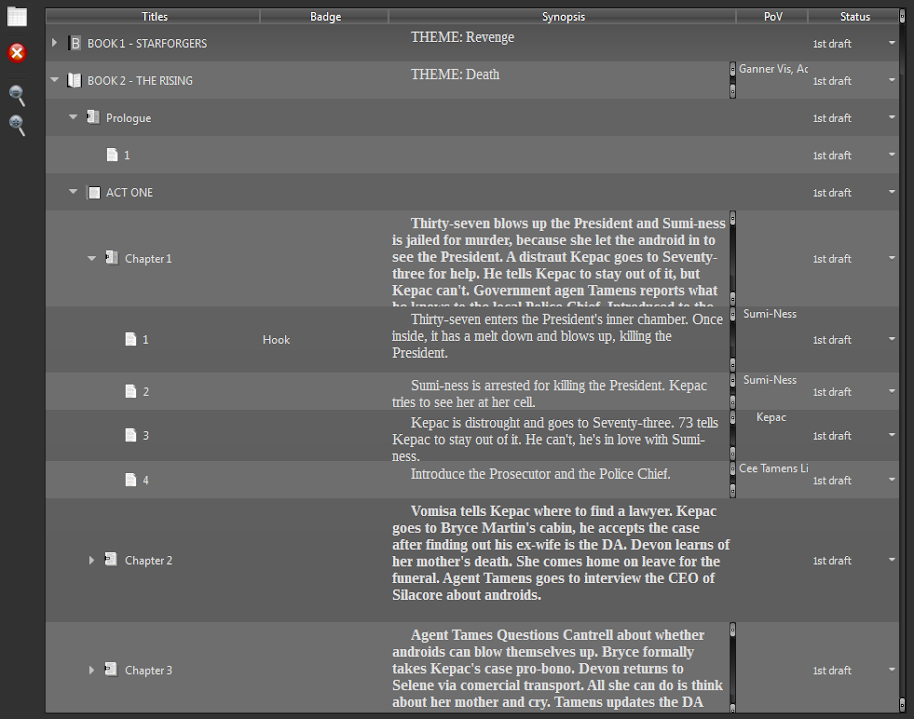
If you prefer to use a spreadsheet type of outline, Plume has the Workbench. The Workbench takes whatever is in your Project tree and displays it in a spreadsheet format. It also includes the POV character. You can add and subtract columns in the Workbench to customize it.
Mise en scene
After you create the framework of your book or outline, you can go back through it and add characters, locations and other pertinent things you’d like to track. This is all done in the Mise en scene area of Plume Creator. In the screenshot below, you can see that I have set the characters and locations used in a scene. The POV character is also set. You set the POV character by highlighting the character on the Stage and clicking on the POV button which an icon that looks like an eye. To get the character you want from the bottom tree, simply drag it onto the stage area above the tree.
Taking the time to add your characters and locations to every scene is sometimes too time consuming during your first draft. After all, your mission is to get the words down, not to fiddle with it. So I try and set those things before I start to write. Again, they are easily changed as you go along.
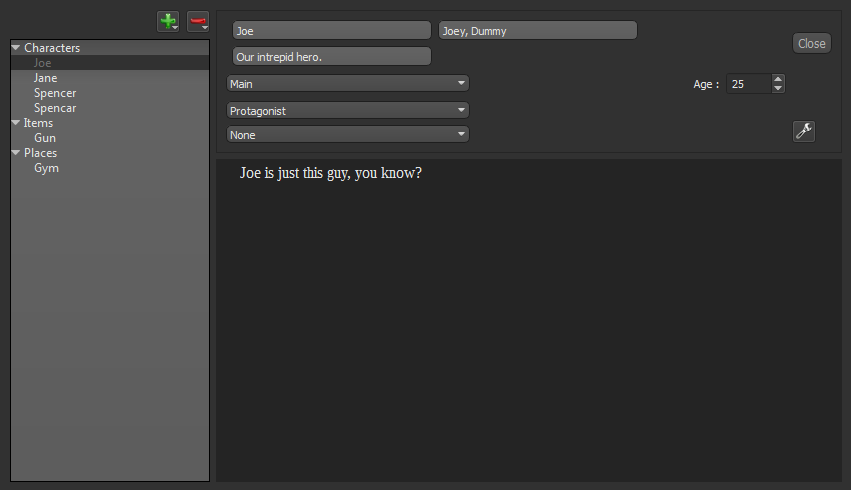
The Mise en scene Manager is where you add and subtract things. Select the Characters area and then click on the Green Plus sign. A New character appears. Select the New character and rename it and then fill in the information. The selection boxes are slanted towards characters and not Items or Places. But I just use the big text box to write down any pertinent details about say a spaceship or a location. If you like to work out the details of your characters and keep that information at your fingertips, this is an awesome feature. In the near future it will be modified and improved upon.
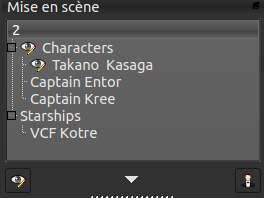
In the Mise en scene dialog, you can add your own categories. For my Space Opera novels I keep track of starships this way. Below is Scene 2 from Chapter 1 of The Blood Empress. You can see the main characters, the POV character and the starship they are all on. I use this feature to keep track of who is in a scene without having to scroll up all the time to remember that alien’s name.
Extras
There’s a lot of added functionality included in Plume Creator and I only use a fraction of it. The program is not as complicated to use as Scrivener. There’s a simple elegance to it. Clean lines and the ability to show you only what you need to see are hallmarks of Plume Creator.
Wordcounts: Along the bottom of the program you have word counts for your Project, Book, Act, Chapter and Scene. You can also set a word count goal per scene before you start and it will track that with a simple green bar.
Tools Bar: On the Tools Bar you can set a timer for your writing session. I never use that feature, but I know many writers who do. So it’s there if you need it and if you don’t remove the bar for it.
Full Screen: There is a full screen mode that takes away all your distractions and lets you just focus on the writing. Sometimes I use this feature.
Workbench: One added feature on the Workbench is the ability to mark what version your manuscript is on. This is done using the drop down menu on the Status column.
Editor Features: Most features you will need are just a right click away on the main editor. But some of them are hidden in a tool bar at the top of the page. Run your cursor over the top left corner of the page to activate this hidden formatting menu. You can also pin this menu and make it visible all the time.
Spell Check: My favorite feature because I spell like a fifth grader.
Styles: Plume does not let you format like a traditional word processor. It has Styles that you can set to format the text of your novel. In the Settings Dialog under Styles you can create your own styles to your heart’s content. I usually have an indent style and a Chapter Header style for my novels that have a character quote at the start of each chapter. The formatting for these things can be pre-set and to apply them I just highlight the text and select the Style I want.
Text: You can also change the text style in the Synopsis and Note areas under Settings Dialog -> Text tab.
Export
After you are finished writing your novel you need to get it out of Plume and into Standard Manuscript Format. In previous versions of Plume, I exported my novel to .odt and edited it in LibreOffice. My editor used Word and made notations and all of that was able to be accessed in Write. But for my latest novel, I’m going to try and do each draft in Plume Creator. This is because my new editor also uses Plume Creator.
Above is the Export dialogue. You can’t export to Word’s .doc, but if you select .odt, you can use OpenOffice or LibreOffice to convert to .doc.
Trilogies
I wanted to say a few things about multi-book series and trilogies because I write them and I’m pretty sure others of you do to. I’m writing a nine book series and I decided to break it up into three Plume Projects. This means that I will have three full size novels in one project and probably a few novellas. This creates some interesting issues, but performance is not one of them. Plume takes all the words you throw at it from 3 Thousand to 3 Million.
The only issue I have had so far is that each book has a bunch of characters unique to it and there are also some that appear in more than one book. Eventually the Mise en Scene gets pretty full and finding a character in a list of hundreds is none trivial. This problem is being addressed now and will be ironed out in the coming year. Which leads me to the final thing I’d like to say about Plume Creator. It’s Open Source. There is currently one developer and a bunch of interested testers helping him out. We’d love to have more developers willing to help out with the project. So if you know someone who can program in C++ and who supports Open Source coding, let her know about Plume.
Part of being a writer is being willing to give back to the writing community. Helping out with a program like Plume is giving back in a huge way. Probably more so than another blog post on how to write believable bad guys.


I don’t see any current entries. I really enjoyed your article. I am running Linux Mint 18.2 Mate. Plume-Creator, version 0.66 is in the software repository, then after installing the system upgraded it to 0.67. A couple of questions:
1. Is there a later version yet?
2. Can I import a mind map file into Plume?
3. I’ve been using Babisco but am giving Plume a hard look. Any comparison thoughts?
Thanks, Darrel
Hi Tony,
Unfortunately, I don’t use proprietary OS’s so I can’t really help you. Best thing I can recommend is to try and contact the developer through the SourceForge page. http://sourceforge.net/p/plume-creator/tickets/?source=navbar
Good luck. The program works much better on Linux. ;-)
Ken
Ken,
I downloaded Plume Creator onto my Asus X401A laptop running Windows 7 and began to use the software with ease and pleasure. Then disaster struck. The project tree on the left of the screen suddenly vanished. Everything else seems to be there. When I go to project and hit the export or print buttons the project tree shows in those windows.
I have tried uninstalling plume, wiping anything plume wherever I can find it and downloading Plume again. This I have tried at least three times but the problem persists.
Any ideas?
Yours hopefully,
Tony Laycock
Steven, glad you enjoyed it.
Thanks so much for this article. I’d never heard of this application & have previously used yWriter5 to work on my novels. Don’t get me wrong, it’s great app as well, but is lacking a few features that Plume Creator seems to handle quite nicely (and as mentioned above, it’s not quite Linux friendly!)
I’ll definitely be giving this a shot & possibly even migrating some existing projects over. Great write up!
Hi Ken
I used yWriter for several years, and it helped me to lay out my first three novels. However, when I switched to Linux Mint, I began to find it hard to get yWriter to run, even in Wine. I looked around, and tried Scrivener (a linux version has now been released) and Writer’s Cafe, but did not really take to either of them. Then I ran across Plume Creator, and was very pleasantly surprised.
However, I then switched to from Debian-based Mint to Manjaro, based on Arch, and thought that I would be unable to use Plume Creator. Imagine my delight, therefore, to find Plume Creator in the Manjaro repositories. It’s now installed and running flawlessly, and I am learning to use it while writing my latest novel. It is a real treasure.
Kind regards
Elizabeth Mills
Elizabeth, that’s awesome news! Thanks for sharing. I hope someday Plume get into the Ubuntu repositories. Enjoy and happy writing!
Ken,
Thanks for your work. I have always wanted to be a writer, but thought that you needed to have an agent, a publisher and someone’s “permission” to get started. I have been writing all my life for no one but myself. In the last few years I started saving stuff digitally; I did not know what I would do with them. I’ve been unable to work productively for several years now and started to think about writing to add some sort of income to my hard working wife’s pay. I’m reading “Write, Publish, Repeat” and the authors recommend Scrivener. Being in financial straits and an OSS kind of guy, I began looking for alternatives. Plume Creator looks like a soft landing place. Thanks for sharing your experience; it’ll be very helpful. I have never attempted a book. Feet first is the only way I know. Let’s jump.
Donald,
Come on in, the water’s inviting. These days all you need is the will to write and the willingness to learn and you can publish anything you want with nobody’s permission. Let me know how you like Plume after using it for a while. I have connections to the programmers and we’re always looking to improve the software.
Welcome writer!
You have posted a really nice article about Plume Creator. Its very informative. I am a occasional writer and was searching for an open source software for story writing. After using this software, I think I have found the perfect software. I would definitely recommend it to others.
Just another thought: I’d love to see the sort of tools to create character dossiers that something like Liquid Story Binder or WriteItNow have. They’re both different, but have features I’d quite like to see combined. I’d look forward to a mise en scene feature that lets me create characters, items, and locations, etc and then for a Chapter or Scene, pull them in or list just those that are relevant to that Scene. Reasonable wordprocessing with typographic characters and style creation, text zoom, and such would be most welcome.
Thanks for this – I’ve been interested in Plume but haven’t done much with it. I’m using Scrivener right now to finish off a novel I started in a different application, but it’s got a thoroughly intractable UI. In a month or so when I start on my next novel, I feel quite inclined to give Plume a real go and see how it works out for me.
Thanks for a great intro to a product I’d never heard of – and I have been looking for this for a long, long tiime.
Cheers
Mike
To Leo,
It means an important file is corrupted. Try to open the .plume_backup as it’s the last good save. If not, you can always recover your texts. Open your .plume with a software like Winzip or Winrar. All files beginning with “T” + number + .html is a text.
Good day,
I find Plume Creator very good, but have run into a problem I cannot solve: on trying to open a file I get this message under the heading Plume Creator Tree File — Parse error: line 1, column 1. How do I fix this?
Great text. Thank you for say a lot in a few lines. I use Kubuntu and Plume Creator come to be a very useful option. I grateful with Plume Creator and his creator Cyril Jacquet.