Part 1 | Part 2 | Part 3 | Part 4 |Part 5 | Part 6 | Part 7 | Part 8 | Part 9 | Part 10
The next model project that I’m embarking on is another version of the Sokol. This one is from mid-war and is all about attack and size. In fact it’s nearly twice as long and probably three times as big as the SS Sokol. The challenge that affords me, the modeler is considerable. I built the SS Sokol with simple, frame and box construction using moderately thick sheet plastic and pre-formed square struts. The end result is a sturdy and simple model.
Size alone dictates that the GCU Sokol be constructed differently. The anchor of the model will be the two 4″ stardrive tubes and the neck that extends from the main superstructure. Here is a side view drawing of the starship.
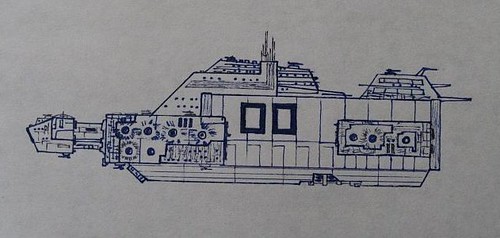
You can see that the cylindrical main engines are the dominate feature. All of the structures built around these engines are simple boxes. So constructing them will be similar to the main sections of the previous model.
My plan is to use 4″ PVC pipe for the engines and cement them together. I will also use a 2″ pipe for the spine of the main superstructure and the neck, going completely into the head. This will give the model a rigid center from which to build around.
I purchased the pipes and cut them to 16″ lengths. I used a hack saw to make the cuts and to make smaller cuts at the front of them for the 2″ pipe to sink into. The more I can fit pieces together, the easier it will be for the cement to bond them together. Here’s a picture that shows the old model sitting beside the new model’s frame.

My next task is to purchase and fit the end caps on the main engines and then cement everything into place.
I found some interesting PVC pieces to use as end caps and even interior of the engines – a drain piece.
After these main pieces are built, I will drill 1/2″ holes in the two main engines and one in the neck tube for the brass pipes that the model will be mounted on. I’ll use a spare piece of wood to mount it to while building it.
The model will just sit on these pipes and not be anchored to them, for easy removal while building and moving.
I have decided that this model will not include lighting and will employ the same technique as the first one, to show portholes (cutting off thin slices of plastic dowel and painting them black or yellow to indicate lights) so the two models will be easy to compare and contrast with on the same mounting board.
I have not decided whether to build a third generation Sokol model, but it would certainly be impressive to have a ship from each period of the war in one display.


4 thoughts on “Building the GCU Sokol Part 1”